创建LVM

查看磁盘信息

1
2
3
4
5
6
7
8
9
10
11
12
13
14
15
16
17
18
19
20
21
22
> fdisk -l

Disk /dev/sdb: 2147 MB, 2147483648 bytes, 4194304 sectors
Units = sectors of 1 * 512 = 512 bytes
Sector size (logical/physical): 512 bytes / 512 bytes
I/O size (minimum/optimal): 512 bytes / 512 bytes


Disk /dev/sda: 21.5 GB, 21474836480 bytes, 41943040 sectors
Units = sectors of 1 * 512 = 512 bytes
Sector size (logical/physical): 512 bytes / 512 bytes
I/O size (minimum/optimal): 512 bytes / 512 bytes
Disk label type: dos
Disk identifier: 0x000cd8ec

Device Boot Start End Blocks Id System
/dev/sda1 * 2048 41943039 20970496 83 Linux

Disk /dev/sdc: 536.9 GB, 536870912000 bytes, 1048576000 sectors
Units = sectors of 1 * 512 = 512 bytes
Sector size (logical/physical): 512 bytes / 512 bytes
I/O size (minimum/optimal): 512 bytes / 512 bytes

对新磁盘分区

1
2
3
4
5
6
7
8
9
10
11
12
13
14
15
16
17
18
19
20
21
22
23
24
25
26
27
28
29
30
31
> fdisk /dev/sdc 
Welcome to fdisk (util-linux 2.23.2).

Changes will remain in memory only, until you decide to write them.
Be careful before using the write command.

Device does not contain a recognized partition table
Building a new DOS disklabel with disk identifier 0xe80f8142.

Command (m for help): n
Partition type:
p primary (0 primary, 0 extended, 4 free)
e extended
Select (default p): p
Partition number (1-4, default 1): 1
First sector (2048-1048575999, default 2048):
Using default value 2048
Last sector, +sectors or +size{K,M,G} (2048-1048575999, default 1048575999):
Using default value 1048575999
Partition 1 of type Linux and of size 500 GiB is set

Command (m for help): t
Selected partition 1
Hex code (type L to list all codes): 8e
Changed type of partition 'Linux' to 'Linux LVM'

Command (m for help): w
The partition table has been altered!

Calling ioctl() to re-read partition table.
Syncing disks.

更新分区表

1
> partprobe

创建PV

1
2
3
4
5
6
7
8
9
10
11
12
13
14
> pvcreate /dev/sdc1 
Physical volume "/dev/sdc1" successfully created
> pvdisplay
"/dev/sdc1" is a new physical volume of "500.00 GiB"
--- NEW Physical volume ---
PV Name /dev/sdc1
VG Name
PV Size 500.00 GiB
Allocatable NO
PE Size 0
Total PE 0
Free PE 0
Allocated PE 0
PV UUID tBxBUK-gOTa-bdtK-1kbZ-01KQ-ASwQ-fuIwLi

创建VG

1
2
3
4
5
6
7
8
9
10
11
12
13
14
15
16
17
18
19
20
21
22
23
> vgcreate VolGroup00 /dev/sdc1 
Volume group "VolGroup00" successfully created
> vgdisplay
--- Volume group ---
VG Name VolGroup00
System ID
Format lvm2
Metadata Areas 1
Metadata Sequence No 1
VG Access read/write
VG Status resizable
MAX LV 0
Cur LV 0
Open LV 0
Max PV 0
Cur PV 1
Act PV 1
VG Size 500.00 GiB
PE Size 4.00 MiB
Total PE 127999
Alloc PE / Size 0 / 0
Free PE / Size 127999 / 500.00 GiB
VG UUID xjcgUh-oZ1N-Fytd-qGCa-9otf-YV4S-Jpjc7W

创建LV

1
2
3
4
5
6
7
8
9
10
11
12
13
14
15
16
17
18
19
> lvcreate -l 127999 -n lvData VolGroup00
Logical volume "lvData" created.
> lvdisplay
--- Logical volume ---
LV Path /dev/VolGroup00/lvData
LV Name lvData
VG Name VolGroup00
LV UUID pVPwru-Eu7W-3lOp-JUKc-qQYF-c3DM-vQ39g1
LV Write Access read/write
LV Creation host, time 3-9, 2016-06-22 15:47:18 +0800
LV Status available
# open 0
LV Size 500.00 GiB
Current LE 127999
Segments 1
Allocation inherit
Read ahead sectors auto
- currently set to 256
Block device 253:0

lvcreate -l 指定PE数量创建(精确)

lvcreate -L 500G 按单位大小创建(可能会有剩余PE)

格式化磁盘

1
2
3
4
5
6
7
8
9
10
11
12
13
14
15
16
17
18
19
20
21
22
23
24
> mkfs.ext4 /dev/VolGroup00/lvData 
mke2fs 1.42.9 (28-Dec-2013)
Discarding device blocks: done
Filesystem label=
OS type: Linux
Block size=4096 (log=2)
Fragment size=4096 (log=2)
Stride=0 blocks, Stripe width=0 blocks
32768000 inodes, 131070976 blocks
6553548 blocks (5.00%) reserved for the super user
First data block=0
Maximum filesystem blocks=2279604224
4000 block groups
32768 blocks per group, 32768 fragments per group
8192 inodes per group
Superblock backups stored on blocks:
32768, 98304, 163840, 229376, 294912, 819200, 884736, 1605632, 2654208,
4096000, 7962624, 11239424, 20480000, 23887872, 71663616, 78675968,
102400000

Allocating group tables: done
Writing inode tables: done
Creating journal (32768 blocks): done
Writing superblocks and filesystem accounting information: done

挂载使用

1
2
3
4
5
6
7
8
9
10
11
> mount /dev/VolGroup00/lvData /apps/
> df -h
Filesystem Size Used Avail Use% Mounted on
/dev/sda1 20G 2.8G 16G 15% /
devtmpfs 912M 0 912M 0% /dev
tmpfs 920M 0 920M 0% /dev/shm
tmpfs 920M 8.4M 912M 1% /run
tmpfs 920M 0 920M 0% /sys/fs/cgroup
tmpfs 184M 0 184M 0% /run/user/0
tmpfs 184M 0 184M 0% /run/user/1000
/dev/mapper/VolGroup00-lvData 493G 73M 467G 1% /apps

LVM扩容

  1. 分区 fdisk /dev/sdd
  2. 创建PV pvcreate /dev/sdd1 && partprob
  3. 扩展VG vgextend VolGroup00 /dev/sdd1
  4. 扩展LV lvextend -L +59G /dev/VolGroup00/lvData
  5. 检查LV e2fsck -f /dev/VolGroup00/lvData
  6. 重新定义分区大小 resize2fs /dev/VolGroup00/lvData
  7. 检查容量 df -h

注意: 如果是xfs文件系统,resize2fs命令要替换成xfs_growfs

解析XML

利用ElementTree.XML将字符串解析成xml对象

1
2
3
4
5
6
7
8
9
10
11
12
13
14
15
16
17
18
19
20
21
22
23
24
25
26
27
28
29
30
31
32
33
from xml.etree import ElementTree as ET

# 打开文件,读取XML内容
str_xml = open('xo.xml', 'r').read()
print(str_xml, type(str_xml))
# 将字符串解析成xml特殊对象,root代指xml文件的根节点
root = ET.XML(str_xml)
print(root, type(root))

------------
<data>
<country name="Liechtenstein">
<rank updated="yes">2</rank>
<year>2023</year>
<gdppc>141100</gdppc>
<neighbor direction="E" name="Austria" />
<neighbor direction="W" name="Switzerland" />
</country>
<country name="Singapore">
<rank updated="yes">5</rank>
<year>2026</year>
<gdppc>59900</gdppc>
<neighbor direction="N" name="Malaysia" />
</country>
<country name="Panama">
<rank updated="yes">69</rank>
<year>2026</year>
<gdppc>13600</gdppc>
<neighbor direction="W" name="Costa Rica" />
<neighbor direction="E" name="Colombia" />
</country>
</data> <class 'str'>
<Element 'data' at 0x101383cc8> <class 'xml.etree.ElementTree.Element'>

从结果中可以看出,root变量获取到了xml文件的根节点信息,且数据类型为xml.etree.ElementTree.Element

利用ElementTree.parse将文件解析成xml对象

1
2
3
4
5
6
7
8
9
10
11
12
from xml.etree import ElementTree as ET

# 直接解析xml文件
tree = ET.parse("xo.xml")
print(tree, type(tree)
# 获取xml文件的根节点
root = tree.getroot()
print(root, type(root))

------------
<xml.etree.ElementTree.ElementTree object at 0x101178780> <class 'xml.etree.ElementTree.ElementTree'>
<Element 'data' at 0x101283cc8> <class 'xml.etree.ElementTree.Element'>

两种解析方式的区别

读取字符串和读取文件的方式的区别:

  • 读取字符串的方式没有创建tree对象

  • 读取文件的方式自动创建了tree对象

而如果需要将在内存修改过的element对象保存成文件的时候,就必须需要用tree对象的write方法来写。

如果直接读取了字符串,默认没有创建tree对象,那么在需要写入到本地文件时,就必须先创建tree对象再进行写入

操作XML

每一个节点就是一个element对象,每一个element对象都有如下方法:

1
2
3
4
5
6
7
8
9
10
11
12
13
14
15
16
17
18
19
20
21
22
23
24
25
26
27
28
29
30
31
32
33
34
35
36
37
38
39
40
41
42
43
44
45
46
47
48
49
50
51
52
53
54
55
56
57
58
59
60
61
62
63
64
65
66
67
68
69
70
71
72
73
74
75
76
77
78
79
80
81
82
83
84
85
86
87
88
89
90
91
92
93
94
95
96
97
98
99
100
101
102
103
104
105
106
107
108
109
110
111
112
113
114
115
116
117
118
119
120
121
122
123
124
125
126
127
128
129
130
131
132
133
134
135
136
137
138
139
140
141
142
143
144
145
146
147
148
149
150
151
152
153
154
155
156
157
158
159
160
161
162
163
164
165
166
167
168
169
170
171
172
173
174
175
176
177
178
179
180
181
182
183
184
185
186
187
188
189
190
191
192
193
194
195
196
197
198
199
200
201
202
203
204
205
206
207
208
209
210
211
212
213
214
215
216
217
218
219
220
221
222
223
224
225
226
227
228
229
230
231
232
233
234
235
236
237
238
239
240
241
242
243
244
245
246
247
248
249
250
251
252
253
254
255
256
257
258
259
260
261
262
263
264
265
266
267
268
269
270
271
272
273
274
275
276
277
278
279
280
281
282
283
284
285
286
287
288
289
290
291
292
293
294
295
296
297
298
299
300
301
302
303
304
305
306
307
308
309
310
311
312
313
314
315
316
317
318
319
320
321
322
323
324
325
326
327
328
329
330
331
332
333
334
335
336
337
class Element:
"""An XML element.

This class is the reference implementation of the Element interface.

An element's length is its number of subelements. That means if you
want to check if an element is truly empty, you should check BOTH
its length AND its text attribute.

The element tag, attribute names, and attribute values can be either
bytes or strings.

*tag* is the element name. *attrib* is an optional dictionary containing
element attributes. *extra* are additional element attributes given as
keyword arguments.

Example form:
<tag attrib>text<child/>...</tag>tail

"""

当前节点的标签名
tag = None
"""The element's name."""

当前节点的属性

attrib = None
"""Dictionary of the element's attributes."""

当前节点的内容
text = None
"""
Text before first subelement. This is either a string or the value None.
Note that if there is no text, this attribute may be either
None or the empty string, depending on the parser.

"""

tail = None
"""
Text after this element's end tag, but before the next sibling element's
start tag. This is either a string or the value None. Note that if there
was no text, this attribute may be either None or an empty string,
depending on the parser.

"""

def __init__(self, tag, attrib={}, **extra):
if not isinstance(attrib, dict):
raise TypeError("attrib must be dict, not %s" % (
attrib.__class__.__name__,))
attrib = attrib.copy()
attrib.update(extra)
self.tag = tag
self.attrib = attrib
self._children = []

def __repr__(self):
return "<%s %r at %#x>" % (self.__class__.__name__, self.tag, id(self))

def makeelement(self, tag, attrib):
创建一个新节点
"""Create a new element with the same type.

*tag* is a string containing the element name.
*attrib* is a dictionary containing the element attributes.

Do not call this method, use the SubElement factory function instead.

"""
return self.__class__(tag, attrib)

def copy(self):
"""Return copy of current element.

This creates a shallow copy. Subelements will be shared with the
original tree.

"""
elem = self.makeelement(self.tag, self.attrib)
elem.text = self.text
elem.tail = self.tail
elem[:] = self
return elem

def __len__(self):
return len(self._children)

def __bool__(self):
warnings.warn(
"The behavior of this method will change in future versions. "
"Use specific 'len(elem)' or 'elem is not None' test instead.",
FutureWarning, stacklevel=2
)
return len(self._children) != 0 # emulate old behaviour, for now

def __getitem__(self, index):
return self._children[index]

def __setitem__(self, index, element):
# if isinstance(index, slice):
# for elt in element:
# assert iselement(elt)
# else:
# assert iselement(element)
self._children[index] = element

def __delitem__(self, index):
del self._children[index]

def append(self, subelement):
为当前节点追加一个子节点
"""Add *subelement* to the end of this element.

The new element will appear in document order after the last existing
subelement (or directly after the text, if it's the first subelement),
but before the end tag for this element.

"""
self._assert_is_element(subelement)
self._children.append(subelement)

def extend(self, elements):
为当前节点扩展 n 个子节点
"""Append subelements from a sequence.

*elements* is a sequence with zero or more elements.

"""
for element in elements:
self._assert_is_element(element)
self._children.extend(elements)

def insert(self, index, subelement):
在当前节点的子节点中插入某个节点,即:为当前节点创建子节点,然后插入指定位置
"""Insert *subelement* at position *index*."""
self._assert_is_element(subelement)
self._children.insert(index, subelement)

def _assert_is_element(self, e):
# Need to refer to the actual Python implementation, not the
# shadowing C implementation.
if not isinstance(e, _Element_Py):
raise TypeError('expected an Element, not %s' % type(e).__name__)

def remove(self, subelement):
在当前节点在子节点中删除某个节点
"""Remove matching subelement.

Unlike the find methods, this method compares elements based on
identity, NOT ON tag value or contents. To remove subelements by
other means, the easiest way is to use a list comprehension to
select what elements to keep, and then use slice assignment to update
the parent element.

ValueError is raised if a matching element could not be found.

"""
# assert iselement(element)
self._children.remove(subelement)

def getchildren(self):
获取所有的子节点(废弃)
"""(Deprecated) Return all subelements.

Elements are returned in document order.

"""
warnings.warn(
"This method will be removed in future versions. "
"Use 'list(elem)' or iteration over elem instead.",
DeprecationWarning, stacklevel=2
)
return self._children

def find(self, path, namespaces=None):
获取第一个寻找到的子节点
"""Find first matching element by tag name or path.

*path* is a string having either an element tag or an XPath,
*namespaces* is an optional mapping from namespace prefix to full name.

Return the first matching element, or None if no element was found.

"""
return ElementPath.find(self, path, namespaces)

def findtext(self, path, default=None, namespaces=None):
获取第一个寻找到的子节点的内容
"""Find text for first matching element by tag name or path.

*path* is a string having either an element tag or an XPath,
*default* is the value to return if the element was not found,
*namespaces* is an optional mapping from namespace prefix to full name.

Return text content of first matching element, or default value if
none was found. Note that if an element is found having no text
content, the empty string is returned.

"""
return ElementPath.findtext(self, path, default, namespaces)

def findall(self, path, namespaces=None):
获取所有的子节点
"""Find all matching subelements by tag name or path.

*path* is a string having either an element tag or an XPath,
*namespaces* is an optional mapping from namespace prefix to full name.

Returns list containing all matching elements in document order.

"""
return ElementPath.findall(self, path, namespaces)

def iterfind(self, path, namespaces=None):
获取所有指定的节点,并创建一个迭代器(可以被for循环)
"""Find all matching subelements by tag name or path.

*path* is a string having either an element tag or an XPath,
*namespaces* is an optional mapping from namespace prefix to full name.

Return an iterable yielding all matching elements in document order.

"""
return ElementPath.iterfind(self, path, namespaces)

def clear(self):
清空节点
"""Reset element.

This function removes all subelements, clears all attributes, and sets
the text and tail attributes to None.

"""
self.attrib.clear()
self._children = []
self.text = self.tail = None

def get(self, key, default=None):
获取当前节点的属性值
"""Get element attribute.

Equivalent to attrib.get, but some implementations may handle this a
bit more efficiently. *key* is what attribute to look for, and
*default* is what to return if the attribute was not found.

Returns a string containing the attribute value, or the default if
attribute was not found.

"""
return self.attrib.get(key, default)

def set(self, key, value):
为当前节点设置属性值
"""Set element attribute.

Equivalent to attrib[key] = value, but some implementations may handle
this a bit more efficiently. *key* is what attribute to set, and
*value* is the attribute value to set it to.

"""
self.attrib[key] = value

def keys(self):
获取当前节点的所有属性的 key

"""Get list of attribute names.

Names are returned in an arbitrary order, just like an ordinary
Python dict. Equivalent to attrib.keys()

"""
return self.attrib.keys()

def items(self):
获取当前节点的所有属性值,每个属性都是一个键值对
"""Get element attributes as a sequence.

The attributes are returned in arbitrary order. Equivalent to
attrib.items().

Return a list of (name, value) tuples.

"""
return self.attrib.items()

def iter(self, tag=None):
在当前节点的子孙中根据节点名称寻找所有指定的节点,并返回一个迭代器(可以被for循环)。
"""Create tree iterator.

The iterator loops over the element and all subelements in document
order, returning all elements with a matching tag.

If the tree structure is modified during iteration, new or removed
elements may or may not be included. To get a stable set, use the
list() function on the iterator, and loop over the resulting list.

*tag* is what tags to look for (default is to return all elements)

Return an iterator containing all the matching elements.

"""
if tag == "*":
tag = None
if tag is None or self.tag == tag:
yield self
for e in self._children:
yield from e.iter(tag)

# compatibility
def getiterator(self, tag=None):
# Change for a DeprecationWarning in 1.4
warnings.warn(
"This method will be removed in future versions. "
"Use 'elem.iter()' or 'list(elem.iter())' instead.",
PendingDeprecationWarning, stacklevel=2
)
return list(self.iter(tag))

def itertext(self):
在当前节点的子孙中根据节点名称寻找所有指定的节点的内容,并返回一个迭代器(可以被for循环)。
"""Create text iterator.

The iterator loops over the element and all subelements in document
order, returning all inner text.

"""
tag = self.tag
if not isinstance(tag, str) and tag is not None:
return
if self.text:
yield self.text
for e in self:
yield from e.itertext()
if e.tail:
yield e.tail

遍历XML文档的所有内容

1
2
3
4
5
6
7
8
9
10
11
12
13
14
15
16
17
18
19
20
21
22
23
24
25
26
27
28
29
30
31
32
33
34
35
36
37
38
from xml.etree import ElementTree as ET

# 直接解析xml文件
tree = ET.parse("xo.xml")

# 获取xml文件的根节点
root = tree.getroot()

# 获取顶层标签
print(root.tag)

# 遍历xml文档的第二层
for i in root:
# 第二层节点的标签名称和标签属性
print(i.tag, i.attrib)
# 遍历xml文档的第三层
for j in i:
print(j.tag, j.text)

------------
data
country {'name': 'Liechtenstein'}
rank 2
year 2023
gdppc 141100
neighbor None
neighbor None
country {'name': 'Singapore'}
rank 5
year 2026
gdppc 59900
neighbor None
country {'name': 'Panama'}
rank 69
year 2026
gdppc 13600
neighbor None
neighbor None

遍历指定节点

1
2
3
4
5
6
7
8
9
10
11
12
13
14
15
16
17
18
19
20
21
from xml.etree import ElementTree as ET

# 直接解析xml文件
tree = ET.parse("xo.xml")

# 获取xml文件的根节点
root = tree.getroot()

# 获取顶层标签
print(root.tag)

# root.iter()的参数中可以填入任意一个节点名称
for node in root.iter("gdppc"):
# 节点的标签名称和内容
print(node.tag, node.text)

------------
data
gdppc 141100
gdppc 59900
gdppc 13600

修改节点的内容

由于修改节点时,均是在内存中进行,不会影响到文件中的内容。所以如果想要修改,则需要重新将内存中的内容写入到文件。

  • 解析字符创的方式来修改和保存
1
2
3
4
5
6
7
8
9
10
11
12
13
14
15
16
17
18
19
20
21
22
23
24
25
26
27
28
29
30
from xml.etree import ElementTree as ET

# 打开文件,将文件的内容读到内存中
str_xml = open("xo.xml", 'r').read()

# 将字符串解析成xml特殊对象,root代指xml文件的根节点
root = ET.XML(str_xml)


# 开始操作xml对象
# 打印一下顶层的标签
print(root.tag)

# 循环所有的year节点
for node in root.iter("year"):
# 将year节点中的内容自增一
new_year = int(node.text) + 1
node.text = str(new_year)

# 设置属性
node.set("name", "polarsnow")
node.set("age", "25")

# 删除属性
del node.attrib["age"]

# 保存文件
## 使用读取字符串的方式在保存之前需要先创建ElementTree对象
tree = ET.ElementTree(root)
tree.write("newxo.xml", encoding="utf-8")
  • 解析文件的方式来修改和保存
1
2
3
4
5
6
7
8
9
10
11
12
13
14
15
16
17
18
19
20
21
22
23
24
25
26
27
28
29
from xml.etree import ElementTree as ET

# 直接解析xml文件
tree = ET.parse("xo.xml")

# 获取xml文件的根节点
root = tree.getroot()

# 开始操作xml对象
# 顶层标签
print(root.tag)

# 循环所有的year节点
for node in root.iter("year"):
# 将year节点中的内容自增一
new_year = int(node.text) + 1
node.text = str(new_year)

# 设置属性
node.set("name", "polarsnow")
node.set("age", "25")

# 删除属性
del node.attrib["age"]

# 保存文件
## 使用parse的方式直接解析xml文件,已经生成了ElementTree对象
## 可以直接调用写的方法
tree.write("newxo.xml", encoding="utf-8")
  • xo.xml
1
2
3
4
5
6
7
8
9
10
11
12
13
14
15
16
17
18
19
20
21
22
<data>
<country name="Liechtenstein">
<rank updated="yes">2</rank>
<year>2023</year>
<gdppc>141100</gdppc>
<neighbor direction="E" name="Austria" />
<neighbor direction="W" name="Switzerland" />
</country>
<country name="Singapore">
<rank updated="yes">5</rank>
<year>2026</year>
<gdppc>59900</gdppc>
<neighbor direction="N" name="Malaysia" />
</country>
<country name="Panama">
<rank updated="yes">69</rank>
<year>2026</year>
<gdppc>13600</gdppc>
<neighbor direction="W" name="Costa Rica" />
<neighbor direction="E" name="Colombia" />
</country>
</data>
  • newxo.xml
1
2
3
4
5
6
7
8
9
10
11
12
13
14
15
16
17
18
19
20
21
22
<data>
<country name="Liechtenstein">
<rank updated="yes">2</rank>
<year name="polarsnow">2024</year>
<gdppc>141100</gdppc>
<neighbor direction="E" name="Austria" />
<neighbor direction="W" name="Switzerland" />
</country>
<country name="Singapore">
<rank updated="yes">5</rank>
<year name="polarsnow">2027</year>
<gdppc>59900</gdppc>
<neighbor direction="N" name="Malaysia" />
</country>
<country name="Panama">
<rank updated="yes">69</rank>
<year name="polarsnow">2027</year>
<gdppc>13600</gdppc>
<neighbor direction="W" name="Costa Rica" />
<neighbor direction="E" name="Colombia" />
</country>
</data>

删除节点

  • 解析字符串的方式来删除节点
1
2
3
4
5
6
7
8
9
10
11
12
13
14
15
16
17
18
19
20
21
22
23
24
from xml.etree import ElementTree as ET

# 打开文件,读取XML内容
str_xml = open('xo.xml', 'r').read()

# 将字符串解析成xml特殊对象,root代指xml文件的根节点
root = ET.XML(str_xml)

# 开始操作xml对象
# 顶层标签
print(root.tag)

# 遍历data下的所有country节点
for country in root.findall('country'):
# 获取每一个country节点下rank节点的内容
rank = int(country.find('rank').text)

if rank > 50:
# 删除指定country节点
root.remove(country)

# 保存文件
tree = ET.ElementTree(root)
tree.write("newxo.xml", encoding='utf-8')
  • 解析文件的方式来删除节点
1
2
3
4
5
6
7
8
9
10
11
12
13
14
15
16
17
18
19
20
21
22
23
from xml.etree import ElementTree as ET

# 直接解析xml文件
tree = ET.parse("xo.xml")

# 获取xml文件的根节点
root = tree.getroot()

# 开始操作xml对象
# 顶层标签
print(root.tag)

# 遍历data下的所有country节点
for country in root.findall('country'):
# 获取每一个country节点下rank节点的内容
rank = int(country.find('rank').text)

if rank > 50:
# 删除指定country节点
root.remove(country)

# 保存文件
tree.write("newnew.xml", encoding='utf-8')

创建xml文档

  • 第一种创建方式
1
2
3
4
5
6
7
8
9
10
11
12
13
14
15
16
17
18
19
20
21
22
23
24
from xml.etree import ElementTree as ET

# 创建根节点
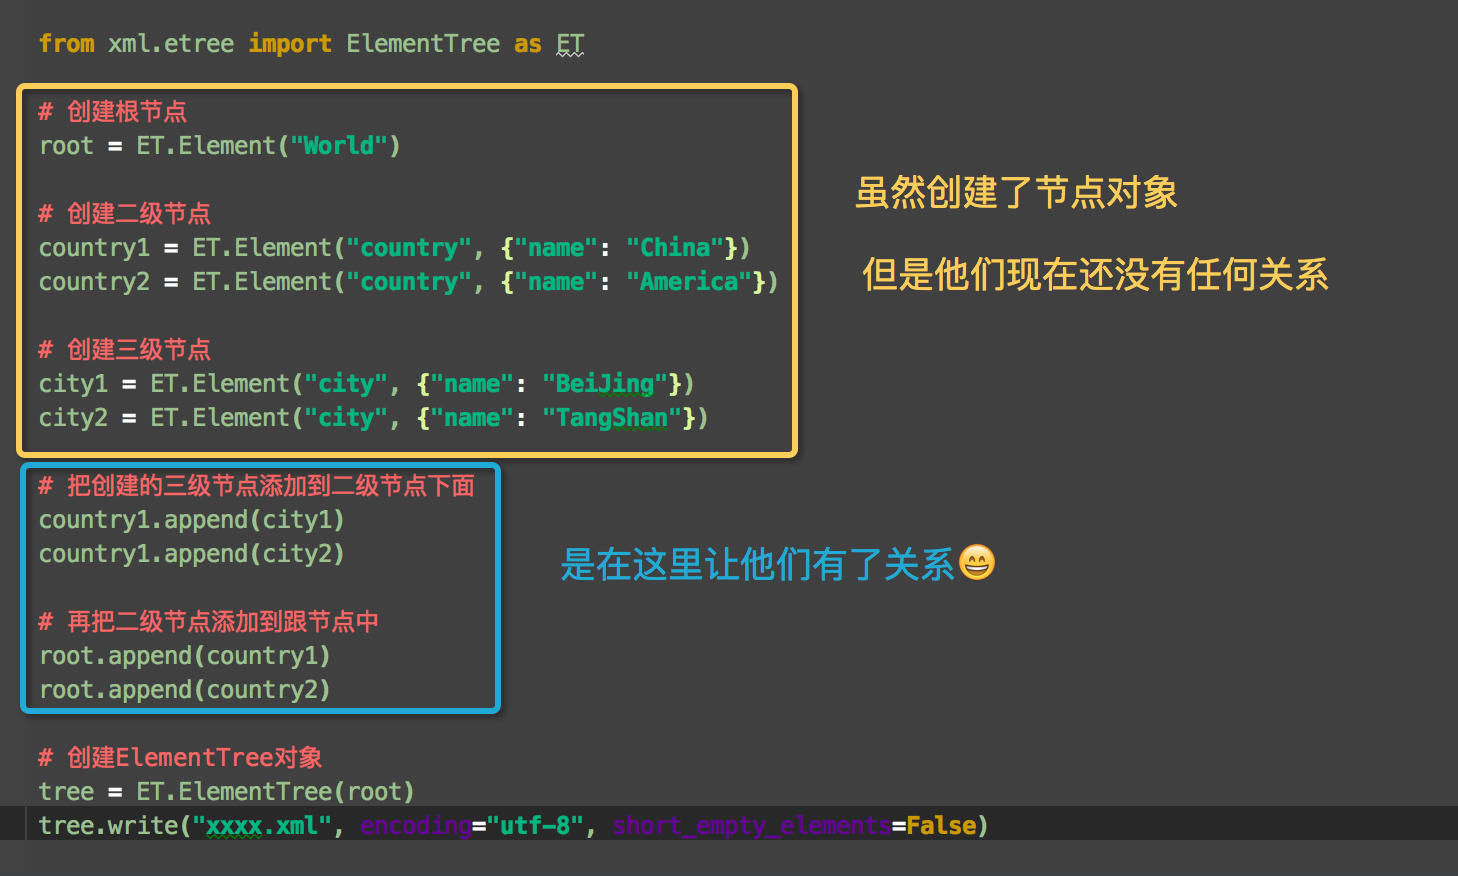
root = ET.Element("World")

# 创建二级节点
country1 = ET.Element("country", {"name": "China"})
country2 = ET.Element("country", {"name": "America"})

# 创建三级节点
city1 = ET.Element("city", {"name": "BeiJing"})
city2 = ET.Element("city", {"name": "TangShan"})

# 把创建的三级节点添加到二级节点下面
country1.append(city1)
country1.append(city2)

# 再把二级节点添加到跟节点中
root.append(country1)
root.append(country2)

# 创建ElementTree对象
tree = ET.ElementTree(root)
tree.write("xxxx.xml", encoding="utf-8", short_empty_elements=False)

  • 第二种创建方式
1
2
3
4
5
6
7
8
9
10
11
12
13
14
15
16
17
18
19
20
21
22
23
24
from xml.etree import ElementTree as ET

# 创建根节点
root = ET.Element("World")

# 创建二级节点
country1 = root.makeelement("country", {"name": "China"})
country2 = root.makeelement("country", {"name": "America"})

# 创建三级节点
city1 = country1.makeelement("city", {"name": "BeiJing"})
city2 = country1.makeelement("city", {"name": "TangShan"})

# 把创建的三级节点添加到二级节点下面
country1.append(city1)
country1.append(city2)

# 再把二级节点添加到跟节点中
root.append(country1)
root.append(country2)

# 创建ElementTree对象
tree = ET.ElementTree(root)
tree.write("xxxx.xml", encoding="utf-8", short_empty_elements=False)
  • 第三种创建方式
1
2
3
4
5
6
7
8
9
10
11
12
13
14
15
16
from xml.etree import ElementTree as ET

# 创建根节点
root = ET.Element("World")

# 创建二级节点
country1 = ET.SubElement(root, "country", attrib={"name": "China"})
country2 = ET.SubElement(root, "country", attrib={"name": "America"})

# 创建三级节点
city1 = ET.SubElement(country1, "city", attrib={"name": "BeiJing"})
city2 = ET.SubElement(country1, "city", attrib={"name": "TangShan"})

et = ET.ElementTree(root) # 生成文档对象
# xml_declaration 添加xml版本信息注释
et.write("test.xml", encoding="utf-8", xml_declaration=True, short_empty_elements=False)

第三种方式不同于上面两种方式的是在创建节点的时候,已经指定了该节点与其他节点的关系。

  • 缩进

原生保存的XML默认没有缩进,如果需要缩进,可以使用如下方式:

1
2
3
4
5
6
7
8
9
10
11
12
13
14
15
16
17
18
19
20
21
22
23
24
25
from xml.etree import ElementTree as ET
from xml.dom import minidom


def prettify(elem):
"""将节点转换成字符串,并添加缩进"""
rough_string = ET.tostring(elem, 'utf-8')
reparsed = minidom.parseString(rough_string)
return reparsed.toprettyxml(indent="\t")

# 创建根节点
root = ET.Element("World")

# 创建二级节点
country1 = ET.SubElement(root, "country", attrib={"name": "China"})
country2 = ET.SubElement(root, "country", attrib={"name": "America"})

# 创建三级节点
city1 = ET.SubElement(country1, "city", attrib={"name": "BeiJing"})
city2 = ET.SubElement(country1, "city", attrib={"name": "TangShan"})

raw_str = prettify(root)

with open("xxoo.xml", 'w', encoding="utf-8") as f:
f.write(raw_str)

Python中的configparser模块用来处理特定格式的文件,其本质上是利用open来操作文件。

Python Version: 3.5+

configparser指定的格式

1
2
3
4
5
6
7
8
9
# 注释1
; 注释2

[section1] # 节点
k1 = v1 # 值
k2:v2 # 值

[section2] # 节点
k1 = v1 # 值

获取所有节点信息

实例配置文件

1
2
3
4
5
[mysql]
version=5.7

[python]
version:3.5

代码

1
2
3
4
5
6
7
8
9
import configparser

config = configparser.ConfigParser()
config.read('test.conf', encoding='utf-8')
ret = config.sections()
print(ret)

------------
['mysql', 'python']

获取指定节点下的所有键值对

1
2
3
4
5
6
7
8
9
import configparser

config = configparser.ConfigParser()
config.read('test.conf', encoding='utf-8')
ret = config.items('mysql')
print(ret)

------------
[('version', '5.7')]

获取指定节点下的所有键

1
2
3
4
5
6
7
8
9
import configparser

config = configparser.ConfigParser()
config.read('test.conf', encoding='utf-8')
ret = config.options('mysql')
print(ret)

------------
['version']

获取指定节点下的所有值

1
2
3
4
5
6
7
8
9
10
11
12
13
14
15
import configparser

config = configparser.ConfigParser()
config.read('test.conf', encoding='utf-8')
# ret = config.get('mysql', 'version')
# print(ret, type(ret))
# ret = config.getint('mysql', 'version')
# print(ret, type(ret))
ret = config.getfloat('mysql', 'version')
print(ret, type(ret))
# ret = config.getboolean('mysql', 'version')
# print(ret, type(ret))

------------
5.7 <class 'float'>

节点的增删查

1
2
3
4
5
6
7
8
9
10
11
12
13
14
15
16
17
18
19
import configparser

config = configparser.ConfigParser()
config.read('test.conf', encoding='utf-8')

# 检查配置文件中有没有指定的节点
has_sec = config.has_section('mysql')
print(has_sec)

# 在配置文件中添加新的节点
config.add_section('java')
config.write(open('test.conf', 'w'))

# 在配置文件中删除已有的节点
config.remove_section('python')
config.write(open('test.conf', 'w'))

------------
True
1
2
3
4
5
> cat test.conf
[mysql]
version = 5.7

[java]

节点内键值对的删改查

1
2
3
4
5
6
> cat test.conf
[mysql]
version = 5.7
path = /usr/local/mysql

[java]
1
2
3
4
5
6
7
8
9
10
11
12
13
14
15
16
17
18
19
import configparser

config = configparser.ConfigParser()
config.read('test.conf', encoding='utf-8')

# 检查配置文件中有没有指定的节点
has_opt = config.has_option('mysql', 'version')
print(has_opt)

# 在配置文件中修改节点
config.set('mysql', 'path', '/usr/local/src/mysql')
config.write(open('test.conf', 'w'))

# 删除节点下指定的键值对
config.remove_option('mysql', 'version')
config.write(open('test.conf', 'w'))

------------
True
1
2
3
4
5
> cat test.conf
[mysql]
path = /usr/local/src/mysql

[java]

configparser模块中,对节点没有修改的操作对节点下的键值对没有增加的操作

在Python中re模块提供了正则表达式的相关操作。其本质,RE是一种小型的,高度专业化的编程语言,通过re模块来实现其功能。正则表达式被编译成一系列字节码,然后由C编写的匹配引擎执行。

我们将涉及两个重要的功能,这将被用于处理的正则表达式。但是首先:有各种各样的字符,当它们在正则表达式中使用,将有特殊的意义。为了避免在处理正则表达式的任何困惑,将使用原始字符串作为r’expression“。

Python Version:3.5+

匹配

字符匹配

  • . 默认匹配除换行符以外的任意字符
  • ^ 匹配字符串的开始
  • $ 匹配字符串的结束
  • [] 指定字符范围匹配
  • | 或
  • \ 转义字符,反斜杠本身需要反斜杠去转义
  • () 分组,去已经匹配到的数据中再去提取数据
  • \d 匹配任何十进制数;它相当于类 [0-9]。
  • \D 匹配任何非数字字符;它相当于类 [^0-9]。
  • \s 匹配任何空白字符;它相当于类 [ \t\n\r\f\v]。
  • \S 匹配任何非空白字符;它相当于类 [^ \t\n\r\f\v]。
  • \w 匹配任何字母数字字符;它相当于类 [a-zA-Z0-9_]。
  • \W 匹配任何非字母数字字符;它相当于类 [^a-zA-Z0-9_]
  • \b 匹配一个单词边界,也就是指单词和空格间的位置。例如, ‘er\b’ 可以匹配”never” 中的 ‘er’,但不能匹配 “verb” 中的 ‘er’。
  • \B 匹配非单词边界。’er\B’ 能匹配 “verb” 中的 ‘er’,但不能匹配 “never” 中的 ‘er’。

次数匹配

    • 重复0次或多次
    • 重复1次或多次
  • ? 重复0次或1次
  • {n} 重复n次
  • {n,} 重复n次或多次
  • {n, m} 重复n次到m次

修饰符

  • re.I 使匹配对大小写不敏感
  • re.L 做本地化识别(locale-aware)匹配
  • re.M 多行匹配,影响 ^ 和 $
  • re.S 使 . 匹配包括换行在内的所有字符
  • re.U 根据Unicode字符集解析字符。这个标志影响 \w, \W, \b, \B.
  • re.X 该标志通过给予你更灵活的格式以便你将正则表达式写得更易于理解。

正则表达式实例

普通字符匹配

  • python 匹配 python
1
2
>>> re.findall(r"python", "Pythonpythoner", re.I)
['Python', 'python']

锚点匹配

  • ^python$ 匹配以python开头结尾的字符串
1
2
3
4
>>> re.findall(r"^python$", "Pythonpythoner", re.I)
[]
>>> re.findall(r"^python$", "Python", re.I)
['Python']

范围匹配

  • [Pp]ython 匹配 “Python” 或 “python”
  • rub[ye] 匹配 “ruby” 或 “rube”
  • [aeiou] 匹配中括号内的任意一个字母
  • [0-9] 匹配任何数字。类似于 [0123456789]
  • [a-z] 匹配任何小写字母
  • [A-Z] 匹配任何大写字母
  • [a-zA-Z0-9] 匹配任何字母及数字
  • [^aeiou] 除了aeiou字母以外的所有字符
  • [^0-9] 匹配除了数字外的字符

或匹配

  • python|java 匹配pythonjava
1
2
>>> re.findall(r"python|java", "Python and java", re.I)
['Python', 'java']

匹配反斜杠

  • \\ 匹配\
1
2
>>> re.findall(r"\\", "Python\ and java", re.I)
['\\']

注意:在匹配的使用,如果想匹配字符串中的一个反斜杠,需要在原生字符串中写两个反斜杠。在匹配结果中,re中匹配到了一个\但是返回的却是\\,是因为Python中也需要使用两个反斜杠来表示一个反斜杠

这里需要详细解释一下:Python与re之间的转义

在之前的笔记中,我们已经知道原生字符串的概念,简单来说,就是我在python中一旦在字符串前面加了r就表示后面这串字符串中所有的字符都当做普通字符来处理。在上面的例子中,我们已经使用了原生字符串的写法,声明字符串中的\已经是普通字符了,为什么到了re中,需要python给出\\才能匹配到\呢?

1
2
3
4
>>> print('\\')
\
>>> print(r'\\')
\\

这是因为,re和Python其实是两套系统,在Python中虽然明确给出了让re去匹配\,但是这一个\传递给re时,在re中一个\也是特殊字符,表示转义,所以不能正确在字符串中匹配到字符\,为了抵消掉re中\的特殊含义,需要使用\\来匹配到一个\,所以从re的角度来说,就要求Python传递过去的是\\才能让re在字符串中匹配到\

1
2
>>> re.findall("\\\\", "Python\ and java", re.I)
['\\']

对比一下,如果不使用原生字符串的话,re仍然需要Python传递过去\\才能匹配到\,但是Python中的字符串如果没有声明是原生字符串的话需要使用\\\\才能表示\\

re模块

上面简单的介绍完re的基本表达式,下面就可以实际使用re的函数来操作匹配字符串啦

match

match,从起始位置开始匹配,匹配成功返回一个对象,未匹配成功返回None

1
2
3
4
def match(pattern, string, flags=0):
"""Try to apply the pattern at the start of the string, returning
a match object, or None if no match was found."""
return _compile(pattern, flags).match(string)

参数

  • pattern 正则表达式
  • string 字符串
  • flags 编译标志位,用于修改正则表达式的匹配方式,如:是否区分大小写,多行匹配等等。

匹配对象方法

  • group() 获取匹配到的所有结果
  • groups() 获取模型中匹配到的分组结果
  • groupdict() 获取模型中匹配到的分组结果
  • start() 返回匹配开始的位置
  • end() 返回匹配结束的位置
  • span() 返回一个元组包含匹配 (开始,结束) 的位置
1
2
3
4
5
6
7
8
9
10
11
12
13
14
15
16
17
18
19
20
21
# 无分组

import re

r = re.match('com', 'comwww.runcomoob')
print(r.group())
print(r.groups())
print(r.groupdict())

r = re.match('com', 'Comwww.runComoob', re.I)
print(r.group())
print(r.groups())
print(r.groupdict())

------------
com
()
{}
Com
()
{}
1
2
3
4
5
6
7
8
9
10
11
12
13
14
15
16
17
18
19
20
21
22
# 有分组
# 为何要有分组?提取匹配成功的指定内容(先匹配成功全部正则,再匹配成功的局部内容提取出来)

import re

r = re.match('c(..)', 'comwww.runcomoob')
print(r.group())
print(r.groups())
print(r.groupdict())

r = re.match('c(..)', 'Comwww.runComoob', re.I)
print(r.group())
print(r.groups())
print(r.groupdict())

------------
com
('om',)
{}
Com
('om',)
{}

观察取出来的结果,groups()中有了匹配结果,匹配的是group()中的结果。也就是说,使用分组,意味着在匹配到整个字符串中再次进行匹配并取值(取括号中的值)

search,浏览整个字符串去匹配第一个,未匹配成功返回None

1
2
3
4
def search(pattern, string, flags=0):
"""Scan through string looking for a match to the pattern, returning
a match object, or None if no match was found."""
return _compile(pattern, flags).search(string)

参数

  • pattern 正则表达式
  • string 字符串
  • flags 编译标志位,用于修改正则表达式的匹配方式,如:是否区分大小写,多行匹配等等。

匹配对象方法

  • group() 获取匹配到的所有结果
  • groups() 获取模型中匹配到的分组结果
  • groupdict() 获取模型中匹配到的分组结果
  • start() 返回匹配开始的位置
  • end() 返回匹配结束的位置
  • span() 返回一个元组包含匹配 (开始,结束) 的位置
1
2
3
4
5
6
7
8
9
10
11
import re

r = re.search('\dcom', 'www.4comrunoob.5com')
print(r.group())
print(r.groups())
print(r.groupdict())

------------
4com
()
{}

re.match与re.search的区别

re.match只匹配字符串的开始,如果字符串开始不符合正则表达式,则匹配失败,函数返回None;而re.search匹配整个字符串,直到找到一个匹配。

1
2
3
4
5
6
7
8
9
10
11
12
13
14
15
16
17
18
19
import re

line = "Cats are smarter than dogs"

matchObj = re.match(r'dogs', line, re.M | re.I)
if matchObj:
print("match --> matchObj.group() : ", matchObj.group())
else:
print("No match!!")

matchObj = re.search(r'dogs', line, re.M | re.I)
if matchObj:
print("search --> matchObj.group() : ", matchObj.group())
else:
print("No match!!")

------------
No match!!
search --> matchObj.group() : dogs

findall

findall,找到 RE 匹配的所有子串,并把它们作为一个列表返回

1
2
3
4
5
6
7
8
9
def findall(pattern, string, flags=0):
"""Return a list of all non-overlapping matches in the string.

If one or more capturing groups are present in the pattern, return
a list of groups; this will be a list of tuples if the pattern
has more than one group.

Empty matches are included in the result."""
return _compile(pattern, flags).findall(string)

参数

  • pattern 正则表达式
  • string 字符串
  • flags 编译标志位,用于修改正则表达式的匹配方式,如:是否区分大小写,多行匹配等等。
1
2
3
4
5
6
7
8
9
10
11
12
13
14
15
# 无分组

import re

r = re.findall(r'\d+', '1one1two2three3four4')
print(r)


# 有分组
r = re.findall(r'\d+(..)', '1one1two2three3four4')
print(r)

------------
['1', '1', '2', '3', '4']
['on', 'tw', 'th', 'fo']

finditer

找到 RE 匹配的所有子串,并把它们作为一个迭代器返回

1
2
3
4
5
6
7
8
9
10
11
12
13
14
import

r = re.finditer(r'\d+', '1one1two2three3four4')
print(r)
for i in r:
print(i.span(), i.group(), i.groupdict())

------------
<callable_iterator object at 0x101178748>
(0, 1) 1 {}
(4, 5) 1 {}
(8, 9) 2 {}
(14, 15) 3 {}
(19, 20) 4 {}

sub

sub,替换匹配成功的指定位置字符串

1
2
3
4
5
6
7
8
def sub(pattern, repl, string, count=0, flags=0):
"""Return the string obtained by replacing the leftmost
non-overlapping occurrences of the pattern in string by the
replacement repl. repl can be either a string or a callable;
if a string, backslash escapes in it are processed. If it is
a callable, it's passed the match object and must return
a replacement string to be used."""
return _compile(pattern, flags).sub(repl, string, count)

参数

  • pattern: 正则模型
  • repl : 要替换的字符串或可执行对象
  • string : 要匹配的字符串
  • count : 指定匹配个数
  • flags : 匹配模式
1
2
3
4
5
6
7
8
# 与分组无关
import re

r = re.sub("a\w+", "18", "hello ps bcd ps lge ps acd 25", 2)
print(r)

------------
hello ps bcd ps lge ps 18 25

split

split,根据正则匹配分割字符串

1
2
3
4
5
6
7
8
9
def split(pattern, string, maxsplit=0, flags=0):
"""Split the source string by the occurrences of the pattern,
returning a list containing the resulting substrings. If
capturing parentheses are used in pattern, then the text of all
groups in the pattern are also returned as part of the resulting
list. If maxsplit is nonzero, at most maxsplit splits occur,
and the remainder of the string is returned as the final element
of the list."""
return _compile(pattern, flags).split(string, maxsplit)
  • pattern: 正则模型
  • string : 要匹配的字符串
  • maxsplit:指定分割个数
  • flags : 匹配模式
1
2
3
4
5
6
7
8
9
10
11
12
13
14
15
16
# 无分组

import re

origin = "hello ps bcd ps lge ps acd 25"
r = re.split("ps", "hello ps bcd ps lge ps acd 25", 1)
print(r)
r = re.split("ps", "hello ps bcd ps lge ps acd 25", 2)
print(r)
r = re.split("ps", "hello ps bcd ps lge ps acd 25", 3)
print(r)

------------
['hello ', ' bcd ps lge ps acd 25']
['hello ', ' bcd ', ' lge ps acd 25']
['hello ', ' bcd ', ' lge ', ' acd 25']
1
2
3
4
5
6
7
8
9
10
11
12
13
# 有分组

import re

origin = "hello ps bcd ps lge ps acd 25"
r = re.split("(ps)", "hello ps bcd ps lge ps acd 25", 1)
print(r)
r = re.split("p(s)", "hello ps bcd ps lge ps acd 25", 1)
print(r)

------------
['hello ', 'ps', ' bcd ps lge ps acd 25']
['hello ', 's', ' bcd ps lge ps acd 25']

从上面的实例中可以看出,在不分组的情况下,列表的长度=maxsplit+1,匹配到的分割字符串并不会返回回来;而在分组的情况下,列表的长度=maxsplit+2,匹配到的字符串也会返回到列表中

compile

compile,编译正则表达式

1
2
3
def compile(pattern, flags=0):
"Compile a regular expression pattern, returning a pattern object."
return _compile(pattern, flags)

参数

  • pattern: 正则模型
  • flags : 匹配模式
1
2
3
4
5
6
7
import re

p = re.compile(r'\d+(...)')
print(p.findall('123one134two256three378four469'))

------------
['one', 'two', 'thr', 'fou']

先把正则表达式编译再匹配,在遍历匹配大型文件时,效率会提高很多,免去了每次还要编译正则表达式

常用正则表达式

  • IP:^(25[0-5]|2[0-4]\d|[0-1]?\d?\d)(\.(25[0-5]|2[0-4]\d|[0-1]?\d?\d)){3}$
  • 手机号:^1[3|4|5|8][0-9]\d{8}$
  • 邮箱:[a-zA-Z0-9_-]+@[a-zA-Z0-9_-]+(\.[a-zA-Z0-9_-]+)+

正则表达式计算器实例

1
2
3
4
5
6
7
8
9
10
11
12
13
14
15
16
17
18
19
20
21
22
23
24
25
26
27
28
29
30
31
32
33
34
35
36
37
38
39
40
41
42
43
44
45
46
47
48
49
50
51
52
53
54
55
56
57
58
59
60
61
62
63
64
65
66
67
68
69
70
71
72
73
74
75
76
77
78
79
80
81
82
83
84
85
86
87
88
89
90
91
92
93
94
95
96
97
import re

# test_expression = '12+33*(11.5+22.5)*44/2+59-(2*3)+(8*5-(10/2))'


def qukuohao(s):
"""
将表达式中所有括号中的内容计算成数值,去掉表达式中所有的括号
:param s: 计算表达式[str]
:return: 没有括号的计算表达式[str]
"""
while True:
if '(' in s:
r = re.split(r'\(([^()]*)\)', s, 1)
# ret = eval(r[1])
ret = cal(r[1])
s = r[0] + str(ret) + r[2]
else:
return s


def fuhao(s):
"""
处理符号的问题
:param s: 计算表达式
:return: 计算表达式
"""
ss = s.replace('+-', '-')
sss = ss.replace('--', '+')
return sss


def chengshufajisuan(s):
"""
专门用来计算不带括号的计算表达式中的乘除法
:param s: 不带括号的计算表达式
:return: 只有加减法的计算表达式(如果不再有加减法,直接返回计算结果)
"""
while True:
if '*' in s or '/' in s:
r = re.split(r'(\d+\.?\d*[*|/]-?\d+\.?\d*)', s, 1)
ss = eval(r[1])
s = r[0] + str(ss) + r[2]
else:
break
return s


def jiajianfajisuan(s):
"""
专门用来计算不带括号的计算表示式中的加减法
:param s: 不带括号且只有加减法的表达式
:return: 最终的计算结果
"""
s = fuhao(s)
while True:
# 5-9的情况;-5-9的情况都需要额外考虑
if '+' in s or s.count('-') > 1 or (s.count('-') == 1 and not s.startswith('-')):
r = re.split(r'(-?\d+\.?\d*[+|-]\d+\.?\d*)', s, 1)
ss = eval(r[1])
s = r[0]+str(ss)+r[2]
else:
break
return s


def cal(s):
"""
+ - * / 混合运算
:param s:
:return:
"""
if '*' in s or '/' in s:
s = chengshufajisuan(s)
if '+' in s or s.count('-') > 1:
s = jiajianfajisuan(s)
return s
else:
return s
elif '+' in s or s.count('-') > 1 or (s.count('-') == 1 and not s.startswith('-')):
s = jiajianfajisuan(s)
return s
else:
return None

# print(cal(qukuohao(test_expression)))

if __name__ == '__main__':
try:
while True:
e = input('输入计算表达式> ')
if '(' in e:
print(cal(qukuohao(e)))
else:
print(cal(e))
except KeyboardInterrupt:
print('Bye')

参考文档:

在线正则匹配工具:

反射,可以理解为利用字符串的形式去对象中操作成员属性和方法

反射的这点特性让我联想到了exec函数,也是把利用字符串的形式去让Python解释器去执行命令

Python Version: 3.5+

解释Python的反射,先提一个简单的需求,现在我有一个简易的网站,由两个文件组成,一个是具体执行操作的commons.py文件,一个是入口文件index.py,现在我需要在入口文件中设置,让用户输入url,根据用户输入的url去后端执行相应的操作,内容如下:

1
2
3
4
5
6
7
8
9
# commons.py
def login():
print('登录页面!')

def logout():
print('退出页面!')

def index():
print('主页面')
1
2
3
4
5
6
7
8
9
10
11
12
13
14
15
16
17
# index.py
import commons

inp = input('url > ')

if inp == 'login':
commons.login()
elif inp == 'logout':
commons.logout()
elif inp == 'index':
commons.index()
else:
print('404')

------------
url > login
登录页面!

上面我使用了if判断,根据每一个url请求去后端执行指定的函数。那现在我的网站内容变多了,在commons.py中有100个页面操作,那么相对应的我在index.py中也要使用if else 对这100个页面函数进行手动指定。

有了Python🐍反射的特性,这个需求就变得异常简单了,先不多解释,先看代码(commons.py保持文件不变,还是拿三个页面的操作举例🌰):

1
2
3
4
5
6
7
8
9
10
11
12
13
14
15
16
17
# index.py
import commons

def run():
inp = input('url > ')
if hasattr(commons, inp):
func = getattr(commons, inp)
func()
else:
print('404')

if __name__ == "__main__":
run()

------------
url > logout
退出页面!

Look! Python的反射立了大功,使用这几行代码,可以应对commons.py文件中任意多个页面函数的调用!接下来我们来详细介绍Python反射中用到的内建函数

getattr()

先看下源码中的解释

1
2
3
4
5
6
7
8
9
def getattr(object, name, default=None): # known special case of getattr
"""
getattr(object, name[, default]) -> value

Get a named attribute from an object; getattr(x, 'y') is equivalent to x.y.
When a default argument is given, it is returned when the attribute doesn't
exist; without it, an exception is raised in that case.
"""
pass

getattr()函数执行成功后会将参数中对象中的方法赋值给新的变量(会返回参数中指定的对象中的方法)相当于参数中的方法又多了一个栈区的变量去引用

getattr()函数的第一个参数需要是个对象,上面的例子中,我导入了自定义的commons模块,commons就是个对象;第二个参数是指定前面对象中的一个方法名称。getattr(x, 'y') 等价于执行了 x.y。假如第二个参数输入了前面对象中不存在的方法,该函数会抛出异常并退出。所以这个时候,为了程序的健壮性,我们需要先判断一下该对象中有没有这个方法,于是hasattr()函数登场了~~

hasattr()

还是先看下源码的解释

1
2
3
4
5
6
7
def hasattr(*args, **kwargs): # real signature unknown
"""
Return whether the object has an attribute with the given name.

This is done by calling getattr(obj, name) and catching AttributeError.
"""
pass

hasattr()函数返回对象是否拥有指定名称的属性,简单的说就是检查在第一个参数的对象中,能否找到与第二参数名相同的方法。源码的解释还说,该函数的实现其实就是调用了getattr()函数,只不过它捕获了异常而已。所以通过这个函数,我们可以先去判断对象中有没有这个方法,有则使用getattr()来获取该方法。

delattr()

删除指定对象中的指定方法,特别提示:只是在本次运行程序的内存中将该方法删除,并没有影响到文件的内容

1
2
3
4
5
6
7
8
9
import commons

print(dir(commons))
delattr(commons, 'index')
print(dir(commons))

------------
['__builtins__', '__cached__', '__doc__', '__file__', '__loader__', '__name__', '__package__', '__spec__', 'index', 'login', 'logout']
['__builtins__', '__cached__', '__doc__', '__file__', '__loader__', '__name__', '__package__', '__spec__', 'login', 'logout']

setattr()

1
2
3
4
5
6
7
def setattr(x, y, v): # real signature unknown; restored from __doc__
"""
Sets the named attribute on the given object to the specified value.

setattr(x, 'y', v) is equivalent to ``x.y = v''
"""
pass

setattr()函数用来给指定对象中的方法重新赋值(将新的函数体/方法体赋值给指定的对象名)仅在本次程序运行的内存中生效。setattr(x, 'y', v) 等价于 x.y = v

1
2
3
4
5
6
7
8
9
10
11
12
13
14
import commons

commons.index()

def newindex():
print('new 主页面!')

setattr(commons, 'index', newindex)

commons.index()

------------
主页面
new 主页面!

__import__

好的,网站发展至今,功能有了很多的扩展,现在一个后台文件已经不能满足我的需求,这个时候需要根据职能划分后台文件,现在我又新增了一个account.py这个用户管理类的文件,也需要导入到首页以备调用。

这个时候,我的首页通过反射,只能指定commons模块的方法任意调用,现在新增了account模块,是不是我又要加入if去判断啦?不用!Python已经帮我们想到这一点了!最后搬出__import__这个大救星。

由于模块的导入也需要使用Python反射的特性,所以模块名也要加入到url中,所以现在url请求变成了类似于commons/index的形式

1
2
3
4
5
6
# account.py
def add_user():
print('添加用户')

def del_user():
print('删除用户')
1
2
3
4
5
6
7
8
9
# commons.py
def login():
print('登录页面!')

def logout():
print('退出页面!')

def index():
print('主页面')
1
2
3
4
5
6
7
8
9
10
11
12
13
# index.py
def run():
inp = input('url > ')
m, f = inp.split('/')
obj_module = __import__(m)
if hasattr(obj_module, f):
func = getattr(obj_module, f)
func()
else:
print('404')

if __name__ == "__main__":
run()
1
2
3
4
5
6
7
8
# 执行
# python3 index.py
url > account/add_user
添加用户

# python3 index.py
url > commons/login
登录页面!

能体会到__import__的作用了吗,就是把字符串当做模块去导入。import 'sys'import sys 是不一样的,不信你执行一下~~要想导入字符串'sys'只能通过__import__('sys')的方式导入

等等,还没完,我的网站进一步细化分工,现在又多了一层目录结构,如下所示:

1
2
3
4
5
6
|- index.py
|- commons.py
|- account.py
|- lib
|- __init__.py
|- connectdb.py

现在我想在index页面中调用lib包下connectdb模块中的方法,还是用之前的方式调用可以吗?我们试一下

1
2
3
4
5
6
7
8
9
10
11
12
13
14
15
def run():
inp = input('url > ')
m, f = inp.split('/')
obj_module = __import__('lib.' + m)
if hasattr(obj_module, f):
func = getattr(obj_module, f)
func()
else:
print('404')

if __name__ == "__main__":
run()

------------
404

哎呦,不行啊。上面我为了测试调用lib下的模块,抛弃了对所有同级目录模块的支持,可还是不行,居然找不到这个这个模块的这个方法。还是来看下源码是怎么说的。

1
2
3
4
5
6
7
8
9
10
11
12
13
14
15
16
17
18
19
def __import__(name, globals=None, locals=None, fromlist=(), level=0): # real signature unknown; restored from __doc__
"""
__import__(name, globals=None, locals=None, fromlist=(), level=0) -> module

Import a module. Because this function is meant for use by the Python
interpreter and not for general use it is better to use
importlib.import_module() to programmatically import a module.

The globals argument is only used to determine the context;
they are not modified. The locals argument is unused. The fromlist
should be a list of names to emulate ``from name import ...'', or an
empty list to emulate ``import name''.
When importing a module from a package, note that __import__('A.B', ...)
returns package A when fromlist is empty, but its submodule B when
fromlist is not empty. Level is used to determine whether to perform
absolute or relative imports. 0 is absolute while a positive number
is the number of parent directories to search relative to the current module.
"""
pass

__import__函数中有一个fromlist参数,源码解释说,如果在一个包中导入一个模块,这个参数如果为空,则return这个包对象,如果这个参数不为空,则返回包下面指定的模块对象,于是做出如下修改

1
2
3
4
5
6
7
8
9
10
11
12
13
14
15
16
def run():
inp = input('url > ')
m, f = inp.split('/')
obj_module = __import__('lib.' + m, fromlist=True)
if hasattr(obj_module, f):
func = getattr(obj_module, f)
func()
else:
print('404')

if __name__ == "__main__":
run()

------------
url > connectdb/mysql
已连接mysql

成功了~~ 但是为了这次成功,我写死了lib前缀,相当于抛弃了commons和account两个导入的功能,所以以上代码并不完善,需求复杂后,还是需要对请求的url做一下判断

1
2
3
4
5
6
7
8
9
10
11
12
13
14
15
16
17
18
19
20
21
def run():
inp = input('url > ')
if len(inp.split('/')) == 2:
m, f = inp.split('/')
obj_module = __import__(m)
if hasattr(obj_module, f):
func = getattr(obj_module, f)
func()
else:
print('404')
elif len(inp.split('/')) == 3:
p, m, f = inp.split('/')
obj_module = __import__(p + '.' + m, fromlist=True)
if hasattr(obj_module, f):
func = getattr(obj_module, f)
func()
else:
print('404')

if __name__ == "__main__":
run()
1
2
3
4
5
6
7
8
9
# 执行
# python3 index.py
url > lib/connectdb/mysql
已连接mysql


# python3 index.py
url > account/del_user
删除用户

虽然重复代码量不高,但我们仍要有一颗消除重复代码的❤️

1
2
3
4
5
6
7
8
9
10
11
12
13
14
15
16
17
18
19
20
def run():
if len(inp.split('/')) == 2:
m, f = inp.split('/')
obj_module = __import__(m)
getf(obj_module, f)
elif len(inp.split('/')) == 3:
p, m, f = inp.split('/')
obj_module = __import__(p + '.' + m, fromlist=True)
getf(obj_module, f)

def getf(m, f):
if hasattr(m, f):
func = getattr(m, f)
func()
else:
print('404')

if __name__ == "__main__":
inp = input('url > ')
run()

Python中的hashlib和hmac加密模块都是内置模块,可以方便的进行字符串加密,这些加密都是单向的,加密后的字符串不可反解成原字符串。但是由于某个固定的字符串使用某个固定的算法得出的加密串是固定的,所以有通过撞库来反解出密码的危险

Python Version: 3.5+

hashlib模块

md5

hashlib模块用于加密相关的操作,代替了md5模块和sha模块,主要提供 SHA1, SHA224, SHA256, SHA384, SHA512 ,MD5 算法

1
2
3
4
5
6
7
8
9
10
11
12
13
14
15
import hashlib

# md5
# 创建md5对象
hash = hashlib.md5()
# update方法接收一个字节类型的数据是Python3+中的强制要求
hash.update(bytes('polarsnow', encoding='utf8'))
# 返回一个十六进制的字符串
print(hash.hexdigest())
# 返回一个二进制的字符串
print(hash.digest())

------------
72c5c8f4fcfeb39c1ebce3be56ebb9f8
b'r\xc5\xc8\xf4\xfc\xfe\xb3\x9c\x1e\xbc\xe3\xbeV\xeb\xb9\xf8'

sha1

1
2
3
4
5
6
7
8
9
10
11
import hashlib

# sha1
# 创建sha1对象
hash = hashlib.sha1()
# 按照指定的字符编码加密字符串
hash.update(bytes('polarsnow', encoding='utf8'))
print(hash.hexdigest())

------------
299a06d4672c5a57facee0cf132593132084a3c0

sha256

1
2
3
4
5
6
7
8
9
import hashlib

# sha256
hash = hashlib.sha256()
hash.update(bytes('polarsnow', encoding='utf8'))
print(hash.hexdigest())

------------
f379eefa6d3a0447d807d679dbd02f0593e8b3c3377da53dd909d98b4dcac9ad

sha384

1
2
3
4
5
6
7
8
9
import hashlib

# sha384
hash = hashlib.sha384()
hash.update(bytes('polarsnow', encoding='utf8'))
print(hash.hexdigest())

------------
768e16e89a691905e7e2413fc67ba2846a39a3d2dd064a7930eb54c36e58a2694b5bf57ca7bb52cea0ad33feaf718ad6

sha512

1
2
3
4
5
6
7
8
9
import hashlib

# sha512
hash = hashlib.sha512()
hash.update(bytes('polarsnow', encoding='utf8'))
print(hash.hexdigest())

------------
ef510ae0c752261359b87e8260b1a8d90a1d9bc373fd5a107e091e9340d60877909b1e7996c32ecb5a571378815aa524e284a65d7d91d33b8fe29f1376ff048e

自定义key加密

上面的加密算法虽然已经足够强大,但是还是存在缺陷,即可以通过撞库反解密码。所以,有必要对加密算法中添加自定义key再来做加密。

1
2
3
4
5
6
7
8
9
10
import hashlib

# md5
hash = hashlib.md5(bytes('9ol4rfv', encoding='utf8'))
hash.update(bytes('polarsnow', encoding='utf8'))
# 返回一个十六进制的字符串
print(hash.hexdigest()

------------
6e4257d3855aaf563ce5c8d499156137

hmac模块

hmac 模块,它内部对我们创建 key 和 内容 进行进一步的处理然后再加密

1
2
3
4
5
6
7
8
import hmac

h = hmac.new(bytes('9ol4rfv', encoding="utf-8"))
h.update(bytes('polarsnow', encoding="utf-8"))
print(h.hexdigest())

------------
2d7acf84247e563213d0ec8e325831ba

Python下有两个系统模块sys ossys模块用于提供对Python解释器相关的操作;os模块用于提供系统级别的操作

Python Version: 3.5+

sys

sys模块中常用的函数

  • sys.argv 命令行参数List,第一个元素是程序本身路径
  • sys.exit(n) 退出程序,正常退出时exit(0)
  • sys.version 获取Python解释程序的版本信息
  • sys.maxint 最大的Int值
  • sys.path 返回模块的搜索路径,初始化时使用PYTHONPATH环境变量的值
  • sys.platform 返回操作系统平台名称
  • sys.stdin 输入相关
  • sys.stdout 输出相关
  • sys.stderror 错误相关

os

  • os.getcwd() 获取当前工作目录,即当前python脚本工作的目录路径
  • os.chdir(“dirname”) 改变当前脚本工作目录;相当于shell下cd
  • os.curdir 返回当前目录: (‘.’)
  • os.pardir 获取当前目录的父目录字符串名:(‘..’)
  • os.makedirs(‘dir1/dir2’) 可生成多层递归目录
  • os.removedirs(‘dirname1’) 若目录为空,则删除,并递归到上一级目录,如若也为空,则删除,依此类推
  • os.mkdir(‘dirname’) 生成单级目录;相当于shell中mkdir dirname
  • os.rmdir(‘dirname’) 删除单级空目录,若目录不为空则无法删除,报错;相当于shell中rmdir dirname
  • os.listdir(‘dirname’) 列出指定目录下的所有文件和子目录,包括隐藏文件,并以列表方式打印
  • os.remove() 删除一个文件
  • os.rename(“oldname”,”new”) 重命名文件/目录
  • os.stat(‘path/filename’) 获取文件/目录信息
  • os.sep 操作系统特定的路径分隔符,win下为”\“,Linux下为”/“
  • os.linesep 当前平台使用的行终止符,win下为”\t\n”,Linux下为”\n”
  • os.pathsep 用于分割文件路径的字符串
  • os.name 字符串指示当前使用平台。win->’nt’; Linux->’posix’
  • os.system(“bash command”) 运行shell命令,直接显示
  • os.environ 获取系统环境变量
  • os.path.abspath(path) 返回path规范化的绝对路径
  • os.path.split(path) 将path分割成目录和文件名二元组返回
  • os.path.dirname(path) 返回path的目录。其实就是os.path.split(path)的第一个元素
  • os.path.basename(path) 返回path最后的文件名。如何path以/或\结尾,那么就会返回空值。即os.path.split(path)的第二个元素
  • os.path.exists(path) 如果path存在,返回True;如果path不存在,返回False
  • os.path.isabs(path) 如果path是绝对路径,返回True
  • os.path.isfile(path) 如果path是一个存在的文件,返回True。否则返回False
  • os.path.isdir(path) 如果path是一个存在的目录,则返回True。否则返回False
  • os.path.join(path1[, path2[, …]]) 将多个路径组合后返回,第一个绝对路径之前的参数将被忽略
  • os.path.getatime(path) 返回path所指向的文件或者目录的最后存取时间
  • os.path.getmtime(path) 返回path所指向的文件或者目录的最后修改时间

本篇文章介绍在Python下实现进度条的几种方法

Python Version: 3.5+

第一种:简单的字符拼接

1
2
3
4
5
6
7
8
9
10
11
12
13
14
15
16
17
18
19
20
21
22
23
24
25
26
import sys
import time
import os

# 获取终端的宽度
w = os.get_terminal_size().columns
# -5个字符是为了为后面'>100%'留地方
# 所以'-'所占用的最大宽度为总终端宽度-5
# 然后计算出每增长1%需要增长几个'-'字符
item = (w - 5) / 100


def view_bar(num, total):
# 计算出进度百分比
rate = num / total
rate_num = int(rate * 100)
# int(rate_num*item) 根据当前进度计算出需要多少个'-'字符(取整数)字符串中的\r是必须存在的
r1 = '\r%s>%d%%' %("-" * int(rate_num*item), rate_num)
# 在终端中输出(不换行)
sys.stdout.write(r1)
sys.stdout.flush()


for i in range(1, 101):
time.sleep(0.1)
view_bar(i, 100)

这里特别说明下,上面的代码中,获取终端宽度的方法os.get_terminal_size().columns是Python3+版本中的新功能,如果是2+的Python,可以通过以下方式获取终端宽度

1
2
3
import curses
screen = curses.initscr()
height, width = screen.getmaxyx()

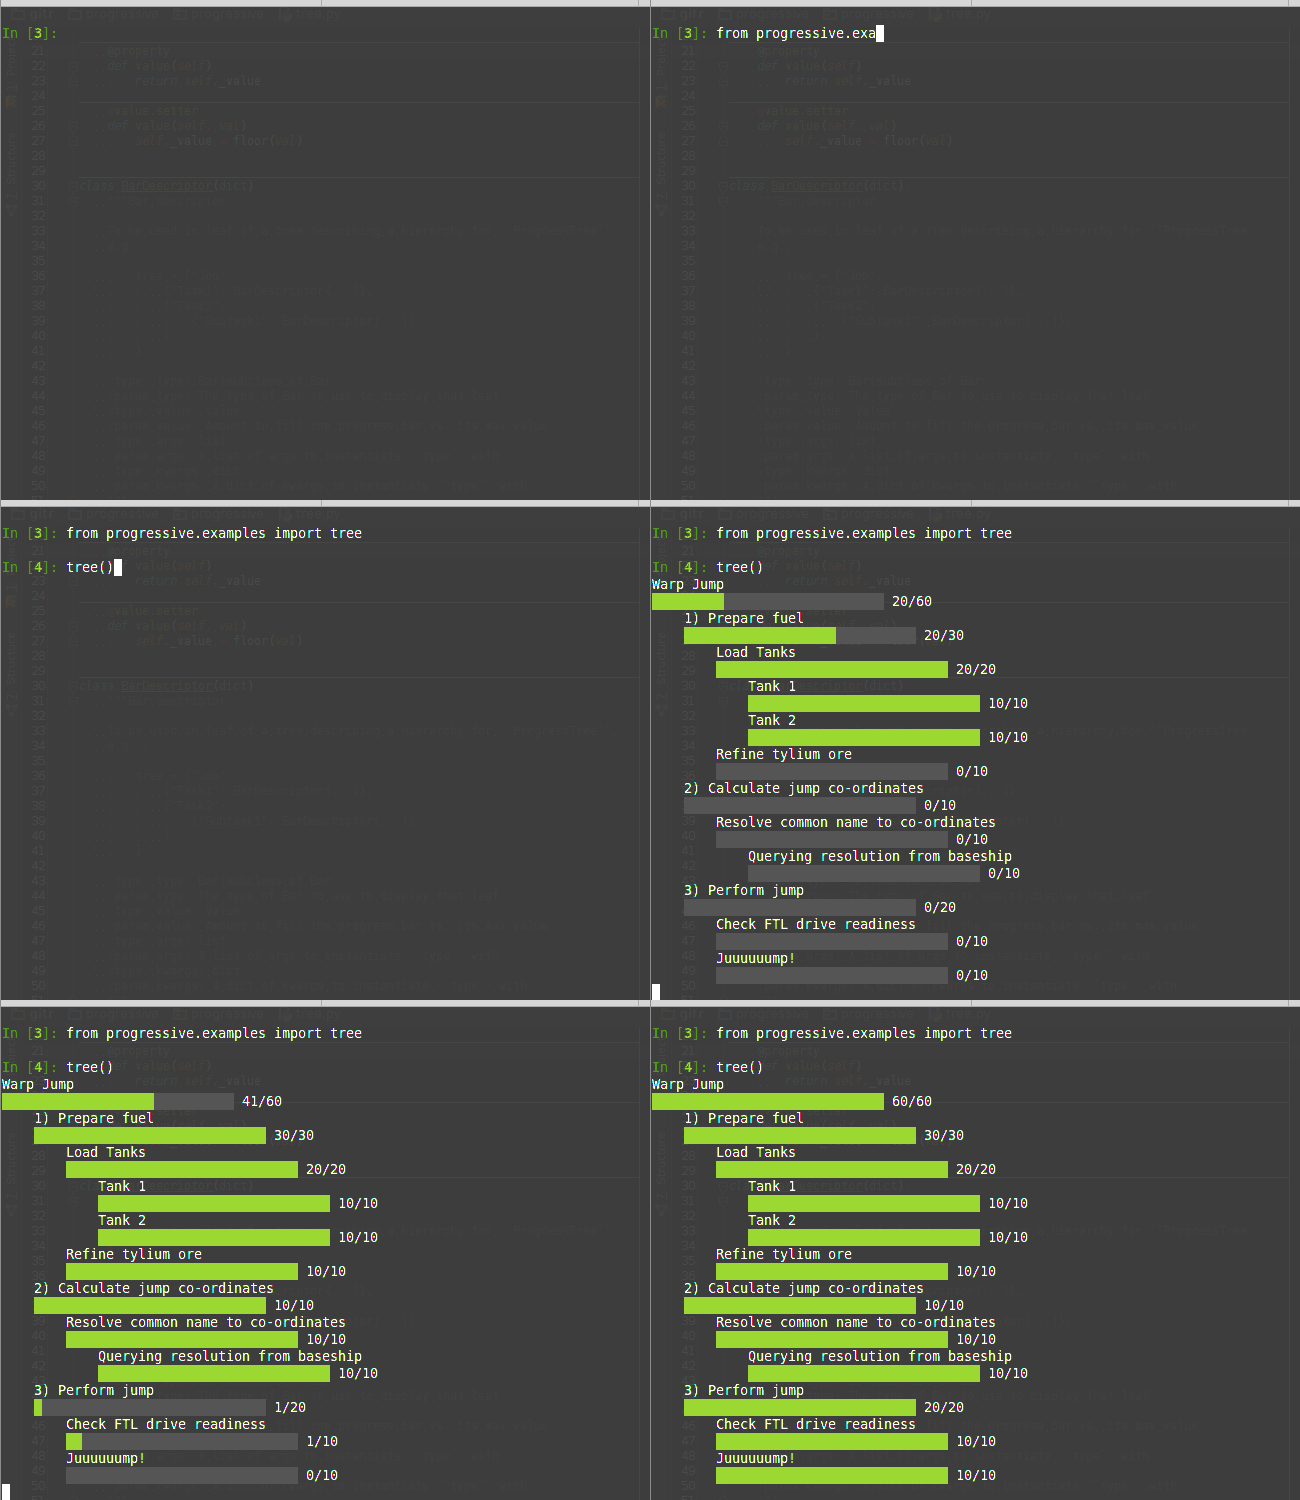
第二种:使用第三方模块

感受下~ 是不是瞬间不想重复造轮子了

progressive

progressbar

模块,即某个功能代码的集合

导入模块的基本方法

1
2
3
4
import module
from module.xx.xx import xx
from module.xx.xx import xx as rename
from module.xx.xx import *

导入模块其实就是告诉Python解释器去解释那个py文件

  • 导入一个py文件,解释器解释该py文件
  • 导入一个包,解释器解释该包下的 __init__.py 文件

导入模块的路径

1
2
3
>>> import sys
>>> sys.path
['', '/Library/Frameworks/Python.framework/Versions/3.5/lib/python35.zip', '/Library/Frameworks/Python.framework/Versions/3.5/lib/python3.5', '/Library/Frameworks/Python.framework/Versions/3.5/lib/python3.5/plat-darwin', '/Library/Frameworks/Python.framework/Versions/3.5/lib/python3.5/lib-dynload', '/Library/Frameworks/Python.framework/Versions/3.5/lib/python3.5/site-packages']

导入指定路径的模块

加入需要导入sys.path中不存在的路径下的模块,此时可以手动添加指定路径到sys.path中(仅当次生效)

1
2
3
4
5
# 添加上上级目录到path中
import sys
import os
project_path = os.path.dirname(os.path.dirname(os.path.abspath(__file__)))
sys.path.append(project_path)
  • __file__ 获取以当前路径为基准的文件相对路径
  • os.path.abspath(__file__) 获取当前文件的绝对路径
  • os.path.dirname(os.path.abspath(__file__)) 获取当前文件所在文件夹的绝对路径(上级目录)
  • os.path.dirname(os.path.dirname(os.path.abspath(__file__))) 获取当前文件的上上级目录

模块中的特殊变量

  • __doc__ 获取模块实现功能的简单描述

  • __file__ 获取以当前路径为基准的文件相对路径

  • __package__ 获取该文件的上层包名

  • __cached__ 实际被导入的缓存文件绝对路径

1
2
3
4
5
6
import maopao

print(maopao.__cached__)

------------
/Users/lvrui/PycharmProjects/untitled/6/c/__pycache__/maopao.cpython-35.pyc
  • __name__ 获取模块/文件的调用者
1
2
# maopao.py
print(__name__)
1
2
3
4
5
6
7
8
# test.py
import maopao

print(__name__)

------------
maopao
__main__

冒泡排序

冒泡排序的原理是两个元素相邻的元素进行比较,小的数放在前面,大的数放在后面。

第一次排序:首先比较第1个数字和第2个数字,小数放前,大数放后;然后比较第2个数和第3个数,小数放前,大数放后……以此类推,找到倒数第二个数字和最后一个数字进行比较,首次排序会将队列中最大的数字放在最后一位

第二次排序:还是从第1位开始和第2位比较,小数放前,大数放后……一直比到倒数第二个数(因为倒数第一个数在第一次排序中已经确定是最大值了)

以此类推,重复以上过程,直到最终排序完毕。

由于排序过程中,永远是小数往前放,大数往后放,类似于气泡上升,所以被称之为冒泡排序,接下来通过Python代码来演示冒泡排序的过程

1
2
3
4
5
6
7
8
9
10
11
12
# 首先来直观感受一下冒泡排序的代码
l = [34, 16, 78, 2, 37, 56, 5]

for j in range(len(l) - 1, 0, -1):
for i in range(j):
if l[i] > l[i+1]:
l[i], l[i+1] = l[i+1], l[i]

print(l)

------------
[2, 5, 16, 34, 37, 56, 78]

接下来我们来一步一步实现上面的代码

首次循环

需要相邻两个数进行比较,小值放前,大值放后。

1
2
3
4
5
6
7
8
9
10
11
12
13
14
15
16
17
18
19
20
21
22
# 首先需要确定循环多少次
# 循环到每个元素需要 len(l) 次, 对应遍历的索引下标是 range(len(l))
# 由于是两两比较,最后一次比较,取得的是倒数第二个 len(l) - 2 这个元素,去和最后一个元素 len(l) - 1 进行比较
# 所以实际需要遍历的次数比这个列表的总长度要少1
# 而range有从0开始且左闭右开的特性,所以在range中只需-1,至此可以确定需要遍历下表的索引就是 range(len(l) - 1)
for i in range(len(l) - 1):
# 里面的判断很简单,根据冒泡算法的核心原理
# 判断当前元素和下一个元素的大小,小放前,大放后
if l[i] > l[i + 1]:
# 如果当前元素大于下一个元素,则交换两个值得位置
l[i], l[i + 1] = l[i + 1], l[i]

# 至此,完成了冒泡排序的第一次循环
# l列表中有7个元素,则len(l) == 7
# 实际只需遍历6个元素即可 len(l) - 1 == 6
# 根据得到的需要遍历的总元素个数,去生成一串索引遍历数组
# range(6) --> 0 1 2 3 4 5 从0开始且左闭右开
# 这样就取到了需要遍历元素的索引
print(l)

------------
[16, 34, 2, 37, 56, 5, 78]
1
2
3
4
5
6
7
8
9
10
11
12
13
14
15
16
17
18
19
20
21
22
# 再来看个详细输出每次交换信息的版本
for i in range(len(l) - 1):
print('比较:', l[i], l[i+1])
if l[i] > l[i + 1]:
l[i], l[i + 1] = l[i + 1], l[i]
print('交换后的数组:', l)

print(l)

------------
比较: 34 16
交换后的数组: [16, 34, 78, 2, 37, 56, 5]
比较: 34 78
比较: 78 2
交换后的数组: [16, 34, 2, 78, 37, 56, 5]
比较: 78 37
交换后的数组: [16, 34, 2, 37, 78, 56, 5]
比较: 78 56
交换后的数组: [16, 34, 2, 37, 56, 78, 5]
比较: 78 5
交换后的数组: [16, 34, 2, 37, 56, 5, 78]
[16, 34, 2, 37, 56, 5, 78]

依次循环

首次循环之后,已经选出了列表中的最大值并放到了最后一位,接下来要做的是再次循环,选择第二大的数字放在倒数第二位

而上面已经实现了首次循环,现在我需要在这次基本循环外,再套上一层循环,由外层循环控制内层的循环总共循环6次。这个表达式很好写range(len(l) - 1) 就能得到6次循环,得到的结果是0 1 2 3 4 5, so, 我可以对代码做出如下修改即可完成冒泡排序

1
2
3
4
5
6
7
8
9
for j in range(len(l) - 1): 
for i in range(len(l) - 1):
if l[i] > l[i + 1]:
l[i], l[i + 1] = l[i + 1], l[i]

print(l)

------------
[2, 5, 16, 34, 37, 56, 78]
1
2
3
4
5
6
7
8
9
10
11
12
13
14
15
16
17
18
19
20
21
22
23
24
25
26
27
28
29
30
31
32
33
34
35
36
37
38
39
40
41
42
43
44
45
46
47
48
49
50
51
52
53
54
55
56
57
58
59
60
61
62
63
64
65
66
# 来感受下带详细输出的版本
for j in range(len(l) - 1):
print('---第', j, '次循环---')
for i in range(len(l) - 1):
print('比较:', l[i], l[i+1])
if l[i] > l[i + 1]:
l[i], l[i + 1] = l[i + 1], l[i]
print('交换后的数组:', l)

print(l)

------------
---第 0 次循环---
比较: 34 16
交换后的数组: [16, 34, 78, 2, 37, 56, 5]
比较: 34 78
比较: 78 2
交换后的数组: [16, 34, 2, 78, 37, 56, 5]
比较: 78 37
交换后的数组: [16, 34, 2, 37, 78, 56, 5]
比较: 78 56
交换后的数组: [16, 34, 2, 37, 56, 78, 5]
比较: 78 5
交换后的数组: [16, 34, 2, 37, 56, 5, 78]
---第 1 次循环---
比较: 16 34
比较: 34 2
交换后的数组: [16, 2, 34, 37, 56, 5, 78]
比较: 34 37
比较: 37 56
比较: 56 5
交换后的数组: [16, 2, 34, 37, 5, 56, 78]
比较: 56 78
---第 2 次循环---
比较: 16 2
交换后的数组: [2, 16, 34, 37, 5, 56, 78]
比较: 16 34
比较: 34 37
比较: 37 5
交换后的数组: [2, 16, 34, 5, 37, 56, 78]
比较: 37 56
比较: 56 78
---第 3 次循环---
比较: 2 16
比较: 16 34
比较: 34 5
交换后的数组: [2, 16, 5, 34, 37, 56, 78]
比较: 34 37
比较: 37 56
比较: 56 78
---第 4 次循环---
比较: 2 16
比较: 16 5
交换后的数组: [2, 5, 16, 34, 37, 56, 78]
比较: 16 34
比较: 34 37
比较: 37 56
比较: 56 78
---第 5 次循环---
比较: 2 5
比较: 5 16
比较: 16 34
比较: 34 37
比较: 37 56
比较: 56 78
[2, 5, 16, 34, 37, 56, 78]

上面已经实现了对一个数组进行冒泡排序,但是还有一个缺陷,就是每次内部循环都换循环6次,而通过冒泡算法的核心原理我们已经得知,在每次循环中都会选出最大的数字依次从后往前放置,那么,也就是说,内侧循环的循环规律只要满足分别range6 5 4 3 2 1即可拿到最终的排序结果,请接着往下看

优化调整

前面的分析得出,首次遍历不需要遍历到最后一位,因为是前一位和后一位去比,所以只需遍历到倒数第二位,与倒数第二位+1的元素进行比较就行啦

当首次循环结束后,最后一位已经确定是最大,不需要遍历,根据前面的规律,首次排序后的数组倒数第二位也不需要遍历,因为会有倒数第三位主动与之比较,所以拿上面的数组举例🌰,得到的规律是,数组长度为7,内层循环第一次需要循环6次,第二次需要循环5次,第三次需要循环4次,第四次需要循环3次,第五次需要循环2次,第六次需要循环1次,退出。

我们再来找一下规律(拿首次循环的情况举例🌰):

  • 内层循环需要的range参数是6, 由len(l) - 1得出0 1 2 3 4 5

  • 外层循环需要的range参数也是6,也由len(l) - 1得出0 1 2 3 4 5

内层循环需要6,但是外层循环range(6)之后得到的队列是0 1 2 3 4 5,我们只需让range从大往小取值即可range(6, 0, -1)取到得值即为6 5 4 3 2 1,正好可以拿到内层循环用,于是,可以做出如下修改

1
2
3
4
5
6
7
8
9
10
11
第一次循环
外层 for j in 6 5 4 3 2 1
内层 range(6) ---> 0 1 2 3 4 5
第二次循环
外层 for j in 5 4 3 2 1
内层 range(5) ---> 0 1 2 3 4
第三次循环
外层 for j in 4 3 2 1
内存 range(4) ---> 0 1 2 3
...
以此类推
1
2
3
4
5
6
7
8
9
10
# 最终代码实现
for j in range(len(l) - 1, 0, -1):
for i in range(j):
if l[i] > l[i+1]:
l[i], l[i+1] = l[i+1], l[i]

print(l)

------------
[2, 5, 16, 34, 37, 56, 78]
1
2
3
4
5
6
7
8
9
10
11
12
13
14
15
16
17
18
19
20
21
22
23
24
25
26
27
28
29
30
31
32
33
34
35
36
37
38
39
40
41
42
43
44
45
46
47
48
49
50
51
# 详细输出版
for j in range(len(l) - 1, 0, -1):
print('---第', j, '次循环---')
for i in range(j):
print('比较:', l[i], l[i+1])
if l[i] > l[i+1]:
l[i], l[i+1] = l[i+1], l[i]
print('交换后的数组:', l)

print(l)

------------
---第 6 次循环---
比较: 34 16
交换后的数组: [16, 34, 78, 2, 37, 56, 5]
比较: 34 78
比较: 78 2
交换后的数组: [16, 34, 2, 78, 37, 56, 5]
比较: 78 37
交换后的数组: [16, 34, 2, 37, 78, 56, 5]
比较: 78 56
交换后的数组: [16, 34, 2, 37, 56, 78, 5]
比较: 78 5
交换后的数组: [16, 34, 2, 37, 56, 5, 78]
---第 5 次循环---
比较: 16 34
比较: 34 2
交换后的数组: [16, 2, 34, 37, 56, 5, 78]
比较: 34 37
比较: 37 56
比较: 56 5
交换后的数组: [16, 2, 34, 37, 5, 56, 78]
---第 4 次循环---
比较: 16 2
交换后的数组: [2, 16, 34, 37, 5, 56, 78]
比较: 16 34
比较: 34 37
比较: 37 5
交换后的数组: [2, 16, 34, 5, 37, 56, 78]
---第 3 次循环---
比较: 2 16
比较: 16 34
比较: 34 5
交换后的数组: [2, 16, 5, 34, 37, 56, 78]
---第 2 次循环---
比较: 2 16
比较: 16 5
交换后的数组: [2, 5, 16, 34, 37, 56, 78]
---第 1 次循环---
比较: 2 5
[2, 5, 16, 34, 37, 56, 78]

打完收工~~

效率分析

  • 稳定
  • 空间复杂度O(1)
  • 时间复杂度O(n2)
  • 最差情况:反序,需要交换n*(n-1)/2个元素
  • 最好情况:正序,不需要交换元素O(n)

插入排序

插入排序和冒泡排序非常像,和冒泡的区别在于,在冒泡中,相邻两个值进行比较,只要后面的数比前面的数大就交换位置;而插入排序每次假设第0索引的元素是最大值,去和队列中剩余所有的元素进行比较,但是插入排序不会实际去交换两个数的位置,而是会保存最大的那个值得索引,比到最后时,将最大值插入到列表的最后面。

1
2
3
4
5
6
7
8
9
10
11
12
13
# 先感受下代码
l = [34, 16, 78, 2, 34, 56, 5]
for i in range(len(l) - 1, 0, -1):
maxindex = 0
for j in range(1, i+1):
if l[j] > l[maxindex]:
maxindex = j
l[i], l[maxindex] = l[maxindex], l[i]

print(l)

------------
[2, 5, 16, 34, 34, 56, 78]
  • 外层循环和冒泡的没有任何区别,那此例来说都是取到了6 5 4 3 2 1这个队列
  • 第4行代码设置了一个最大值的索引,我假设每次第0个元素都是最大值,这一步是插入排序的核心,用来保存最大值的索引位置
  • 第5行内存循环和冒泡的有些差别
    • 为什么冒泡从0开始,而插入要指定从1开始?因为插入排序已经指定了最大值的索引的是0,插入排序会拿这个“最大值”去和每一个元素比较,所以当然要从1开始啦!!
    • 为什么以i+1结束?上面也说到了,假设的最大值索引0,要和剩余的所有的元素进行比较,包括取最后一个元素的索引进行比较,而range有左闭右开的特性,不包含右边的值,所以在这里要+1一下,才能取到最后一个值的索引。
  • 第6行,拿列表中的其他元素与“最大值”进行比较
  • 第7行,如果成立,则保存最大值的索引
  • 第8行,在整个列表遍历一次过后,maxindex的索引就是最大值,故将队列中最后一个元素与maxindex对应的元素进行调换,这样一来,每次都会把最大值依次从后往前放置。
1
2
3
4
5
6
7
8
9
10
11
12
13
14
15
16
17
18
19
20
# 体验下详细的信息输出
l = [34, 16, 78, 2, 34, 56, 5]
for i in range(len(l) - 1, 0, -1):
maxindex = 0
for j in range(1, i+1):
if l[j] > l[maxindex]:
maxindex = j
l[i], l[maxindex] = l[maxindex], l[i]
print(l, i)

print(l)

------------
[34, 16, 5, 2, 34, 56, 78] 6
[34, 16, 5, 2, 34, 56, 78] 5
[34, 16, 5, 2, 34, 56, 78] 4
[2, 16, 5, 34, 34, 56, 78] 3
[2, 5, 16, 34, 34, 56, 78] 2
[2, 5, 16, 34, 34, 56, 78] 1
[2, 5, 16, 34, 34, 56, 78]

插入排序相对于冒泡排序的好处是,每次内层循环结束后,不管队列的数值怎样分布,都只会有一次实际的换值操作。

效率分析

  • 稳定
  • 空间复杂度O(1)
  • 时间复杂度O(n2)
  • 最差情况:反序,需要移动n*(n-1)/2个元素
  • 最好情况:正序,不需要移动元素

选择排序

选择排序的核心思想是始终维护一个有序的队列,依次用队列中的每一个元素与后面的所有元素进行对比,小放前,大放后

例如现有如下列表:

1
l = [34, 16, 78, 2, 34, 56, 5]

选择排序算法实现:

1
2
3
4
5
用第1个元素和第2 3 4 5 6 7的元素进行对比
用第2个元素和第3 4 5 6 7的元素进行对比
用第3个元素和第4 5 6 7的元素进行对比
......
依次类推

每次对比完后,拿来对比的那个基准值都会被换成当次循环的最小值,从这里可以对比冒泡和排序

  • 冒泡是相邻两两比较,只要比前面的值小就交换位置,属于从大往小排
  • 插入排序也是相邻两两比较,每次都假设索引0为最大值,与剩余的所有元素进行比较,记录最大值的索引,把最后一个值与最大值进行交换,属于从大往小排
  • 选择排序是从小往大排,第一次取第0索引去和所有元素比较,换得最小值放到了最前面,第二次取第1索引去和所有元素比较,换得的最小值依次从前往后排
1
2
3
4
5
6
7
8
9
10
11
12
13
14
15
16
17
18
19
20
21
22
23
24
25
26
27
28
29
30
31
32
33
34
35
36
37
38
39
40
41
42
43
44
45
46
47
48
49
50
51
52
53
54
55
56
57
58
59
60
61
62
63
64
65
66
67
68
69
70
71
72
73
74
75
76
l = [34, 16, 78, 2, 34, 56, 5]

for i in range(len(l)-1):
print('------' * 9)
print('待操作的列表--->', l, '操作索引--->', i)
print('------' * 9)
for j in range(i+1, len(l)):
print(l[i], l[j])
if l[i] > l[j]:
print('调换位置%s, %s' %(l[j], l[i]))
l[i], l[j] = l[j], l[i]
print('调换完位置的列表--->', l)

print(l)

------------
------------------------------------------------------
待操作的列表---> [34, 16, 78, 2, 34, 56, 5] 操作索引---> 0
------------------------------------------------------
34 16
调换位置16, 34
调换完位置的列表---> [16, 34, 78, 2, 34, 56, 5]
16 78
16 2
调换位置2, 16
调换完位置的列表---> [2, 34, 78, 16, 34, 56, 5]
2 34
2 56
2 5
------------------------------------------------------
待操作的列表---> [2, 34, 78, 16, 34, 56, 5] 操作索引---> 1
------------------------------------------------------
34 78
34 16
调换位置16, 34
调换完位置的列表---> [2, 16, 78, 34, 34, 56, 5]
16 34
16 56
16 5
调换位置5, 16
调换完位置的列表---> [2, 5, 78, 34, 34, 56, 16]
------------------------------------------------------
待操作的列表---> [2, 5, 78, 34, 34, 56, 16] 操作索引---> 2
------------------------------------------------------
78 34
调换位置34, 78
调换完位置的列表---> [2, 5, 34, 78, 34, 56, 16]
34 34
34 56
34 16
调换位置16, 34
调换完位置的列表---> [2, 5, 16, 78, 34, 56, 34]
------------------------------------------------------
待操作的列表---> [2, 5, 16, 78, 34, 56, 34] 操作索引---> 3
------------------------------------------------------
78 34
调换位置34, 78
调换完位置的列表---> [2, 5, 16, 34, 78, 56, 34]
34 56
34 34
------------------------------------------------------
待操作的列表---> [2, 5, 16, 34, 78, 56, 34] 操作索引---> 4
------------------------------------------------------
78 56
调换位置56, 78
调换完位置的列表---> [2, 5, 16, 34, 56, 78, 34]
56 34
调换位置34, 56
调换完位置的列表---> [2, 5, 16, 34, 34, 78, 56]
------------------------------------------------------
待操作的列表---> [2, 5, 16, 34, 34, 78, 56] 操作索引---> 5
------------------------------------------------------
78 56
调换位置56, 78
调换完位置的列表---> [2, 5, 16, 34, 34, 56, 78]
[2, 5, 16, 34, 34, 56, 78]

效率分析

  • 不稳定
  • 空间复杂度:O(1)
  • 时间复杂度:O(n2)
  • 最坏情况:O(n2) 第一个元素为最大元素,其余元素正序,需要交换n-1个元素
  • 最好情况:O(n2) 正序,不需要交换元素